

How To Make The Ultimate Ableton Drum Rack
What exactly is the perfect Ableton Drum Rack? Its one that you can use over and over again in different situations.
You'll never make a single holy drum rack that covers all your bases at all times.
You'll probably need to make a lot of them over your career as a music producer.
But we think we have a concept for one that almost can.
Utilize Every Drum Sound You Have
Today we have a technique in Ableton that will allow you to put literally hundreds of drum samples in one drum rack you can use over and over again.
We're going to do it in a way that will keep things organized and be easy to use. It's a huge time saver too.
It's much more convenient than building dozens of drum racks and decide which samples should go together ahead of time or using the hot swap button constantly.
We recommend you fill this drum rack with all your best sounds because you'll be able to scroll through the entire drum rack very quickly to find your favorite combinations.

What You Will Need First
Before we show you how do build this drum rack, it will help if you have all the drum sounds you want to use organized in a folder first.
You want drums in each major category of sound you find in a drum kit.
Make a folder of kicks, snare, hi hats, cymbals, electronic sounds, other instruments, effects, and one shots you want to use.
A minimum of 10-20 sounds in each folder is a good start with a maximum of 127 sounds per category.
For example, you can have up to 127 sounds in the kick drum category, 127 snares, etc. Not 127 total sounds in the kit.
Unfortunately you're not going to be able to dump your entire sample library into this kit, but that wouldn't be so practical anyway.
It would make more sense to build some of these kits with a single genre or vibe in mind.
Learn This One Time and It's Yours Forever
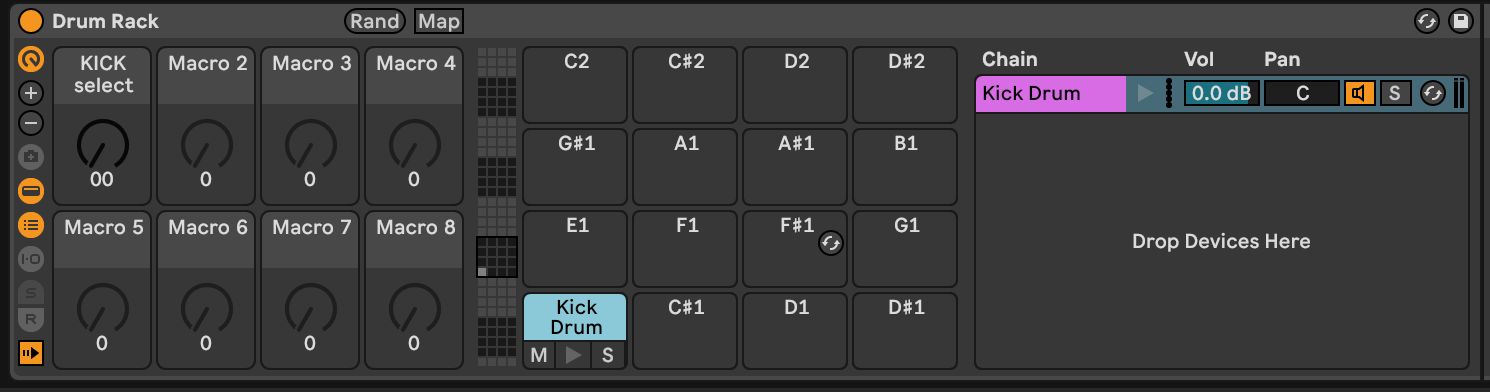
Let's get this set up. First, drag an empty Drum Rack onto a new MIDI track in Ableton Live.
Next, drag and empty instance of Ableton Sampler on to an empty drum pad in your Drum Rack.
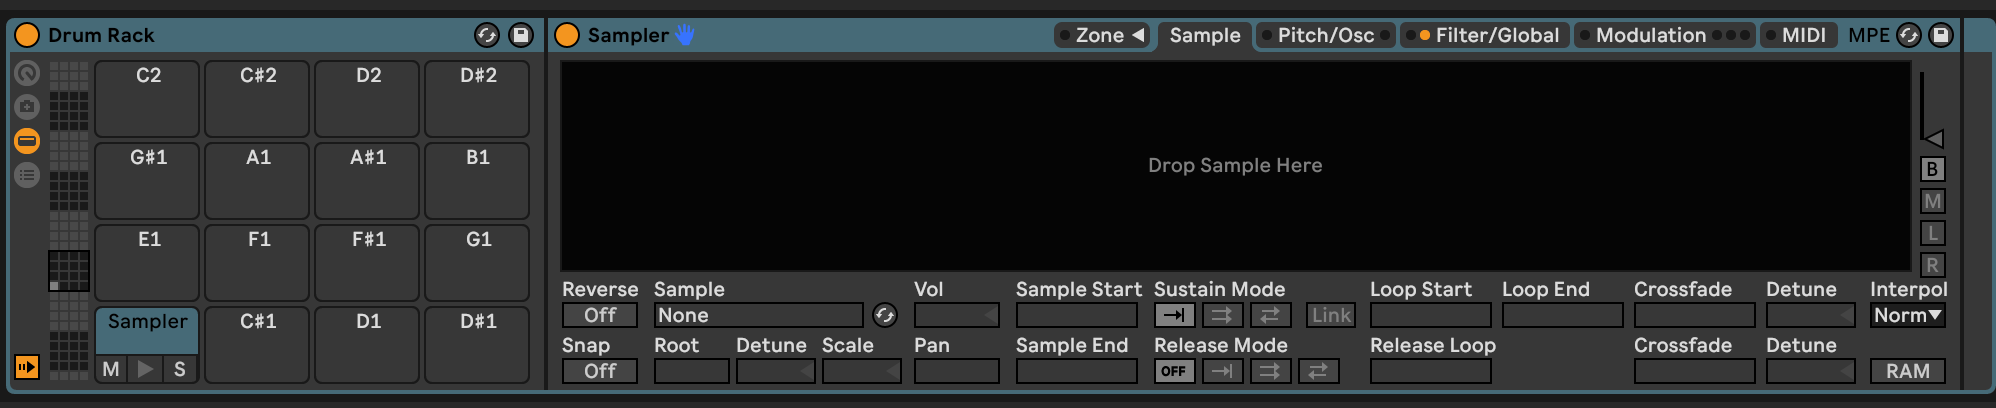
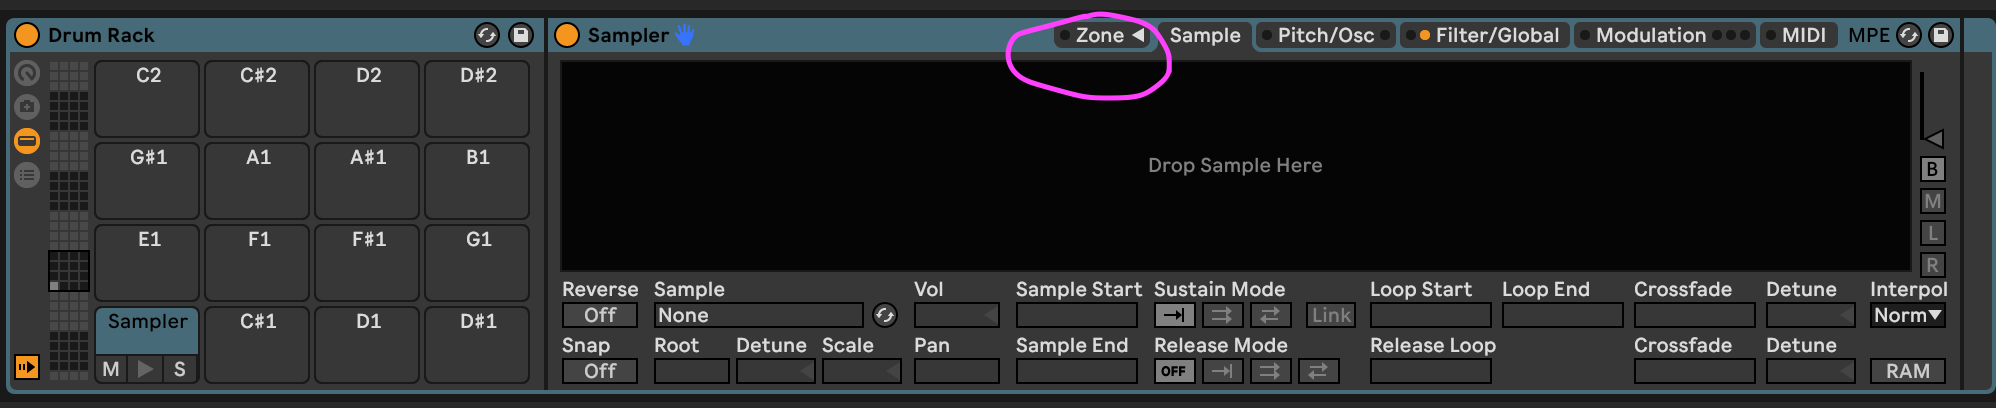
Open up the Zone menu inside the Sampler.
This is where the majority of the editing will come together.
How To Add Drums & Distribute Them In Ableton Live
From either your folder or the Ableton Live Browser, you can now drag a collection of drum samples into the drop zone of your Sampler instance
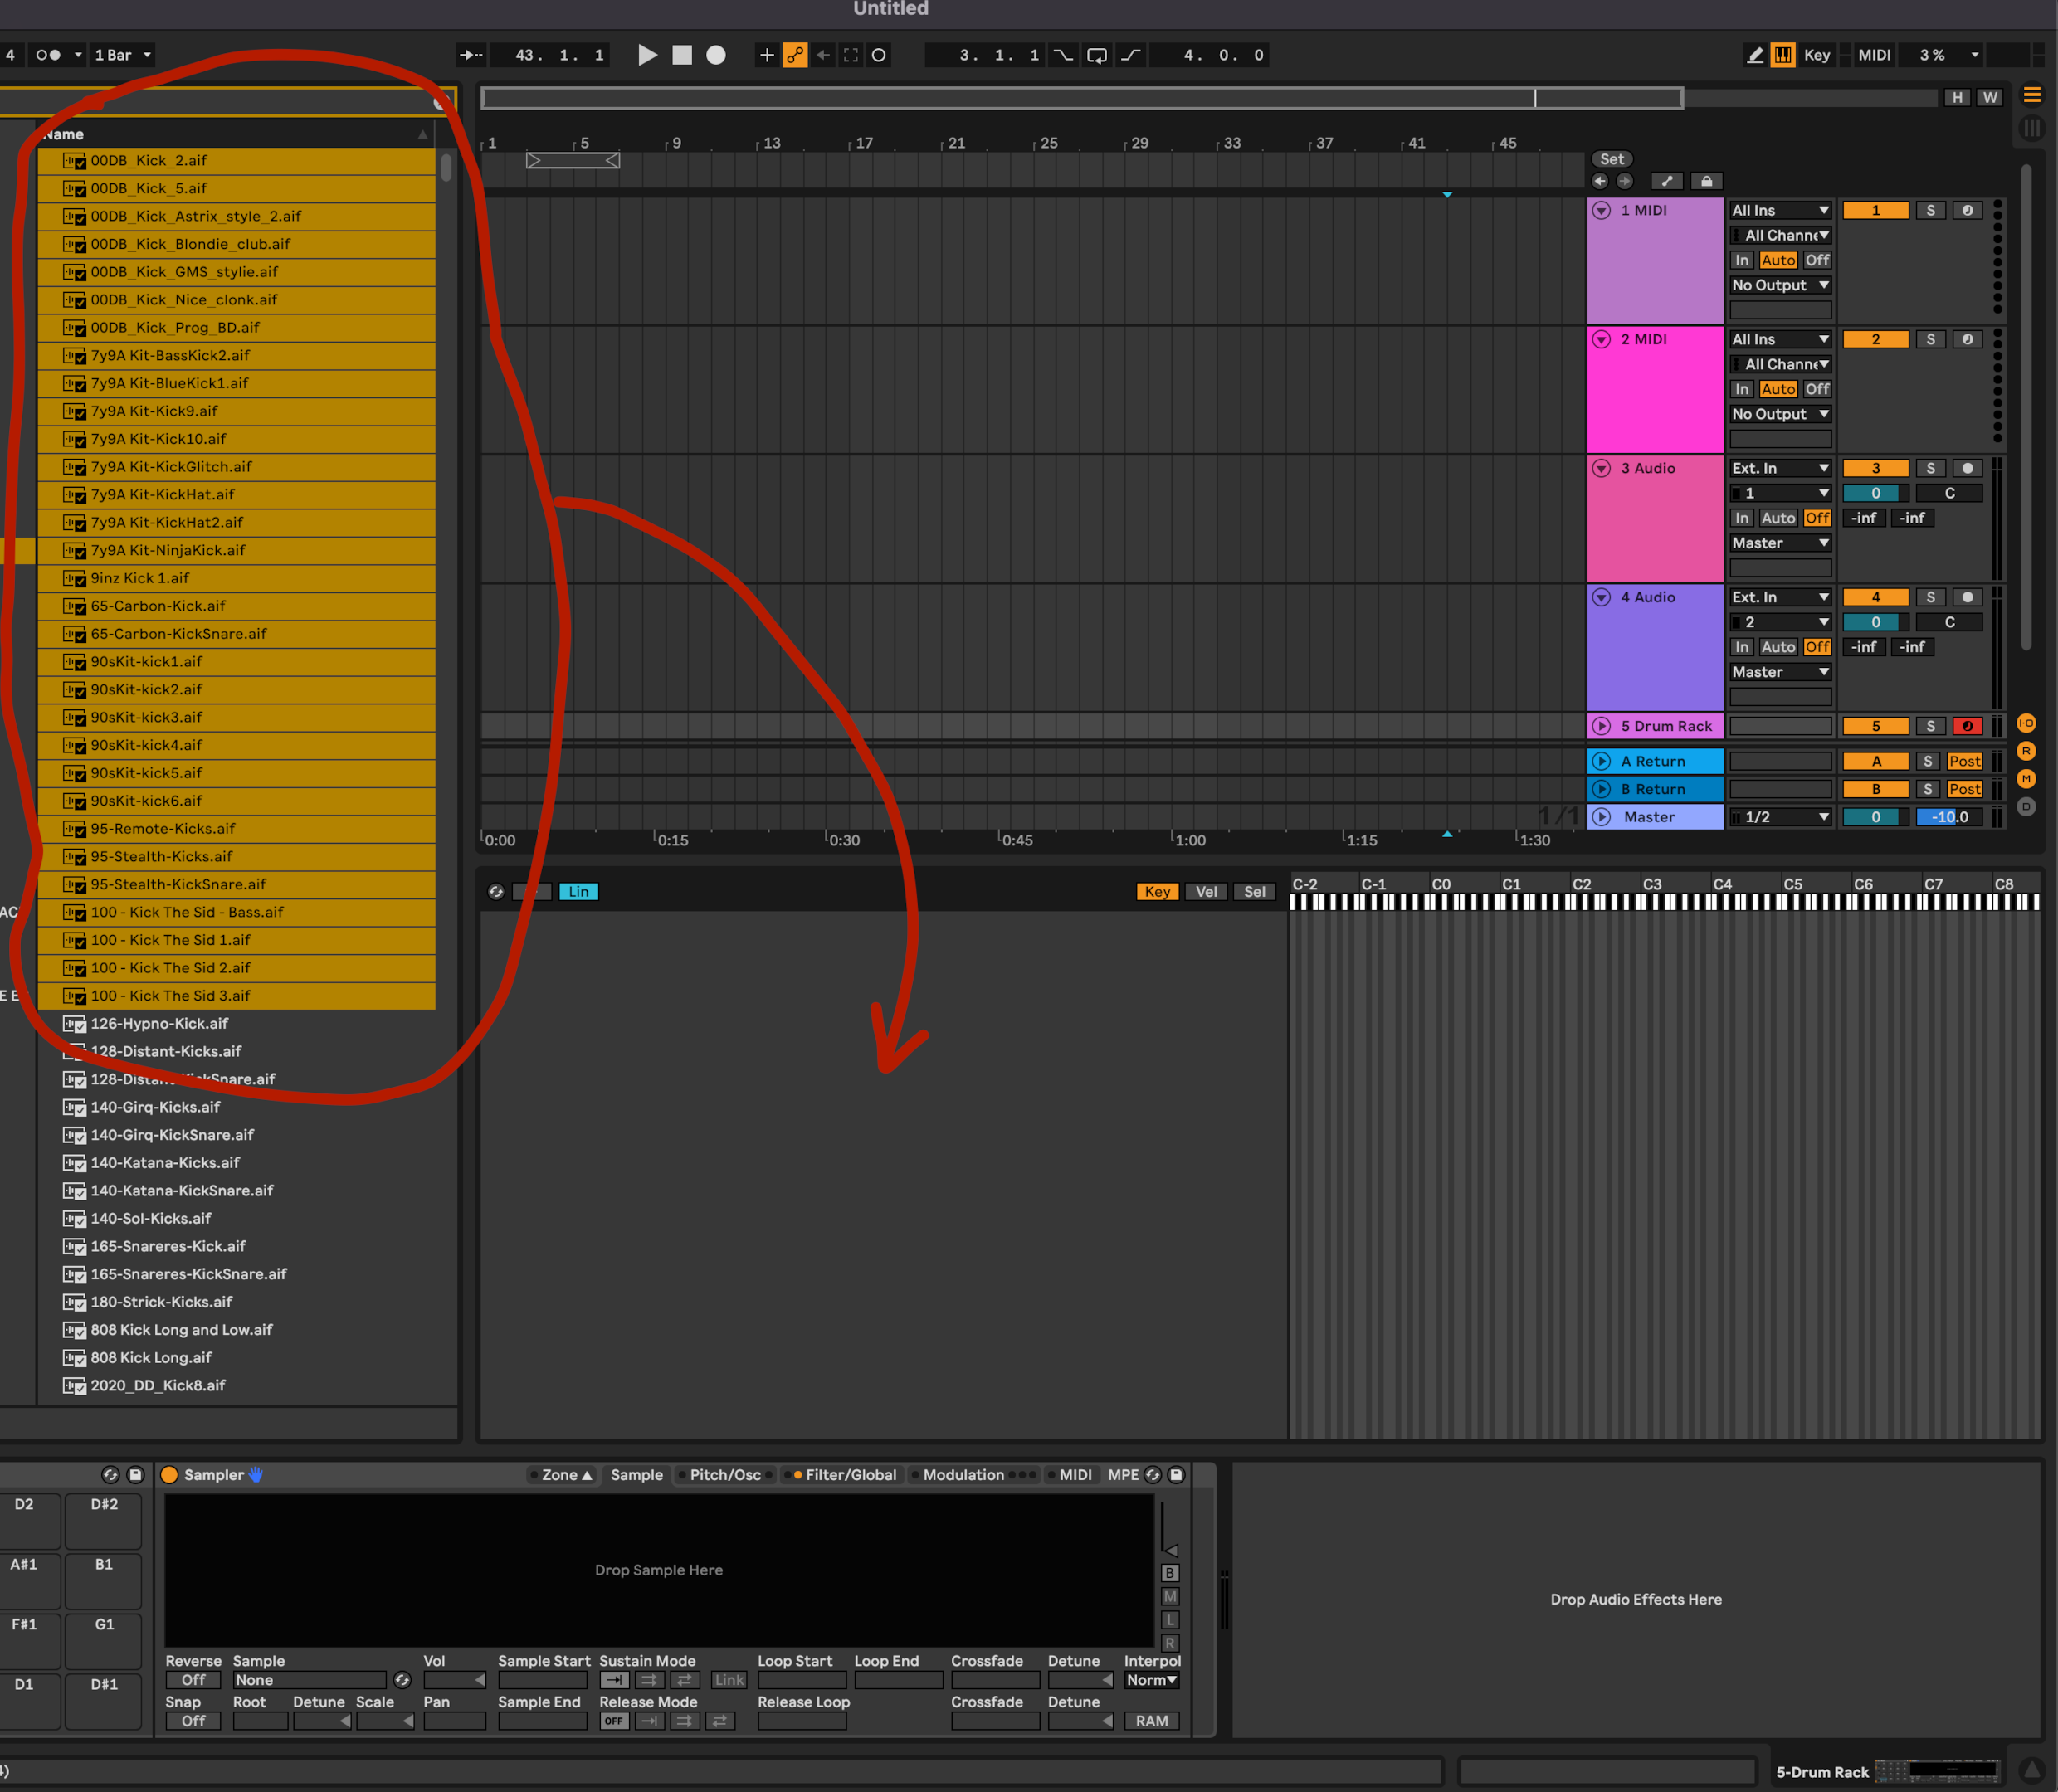
Ableton Sampler allows you to edit the key zones a sample corresponds to, velocity zones, and sample selection. You need to pick the third option, sample selection.
In it's current state, when you trigger the drum pad that this Sampler is placed on you will hear every drum sample you have loaded play back at once.
We are going to tell Ableton Live that we only want to trigger one sound at a time.
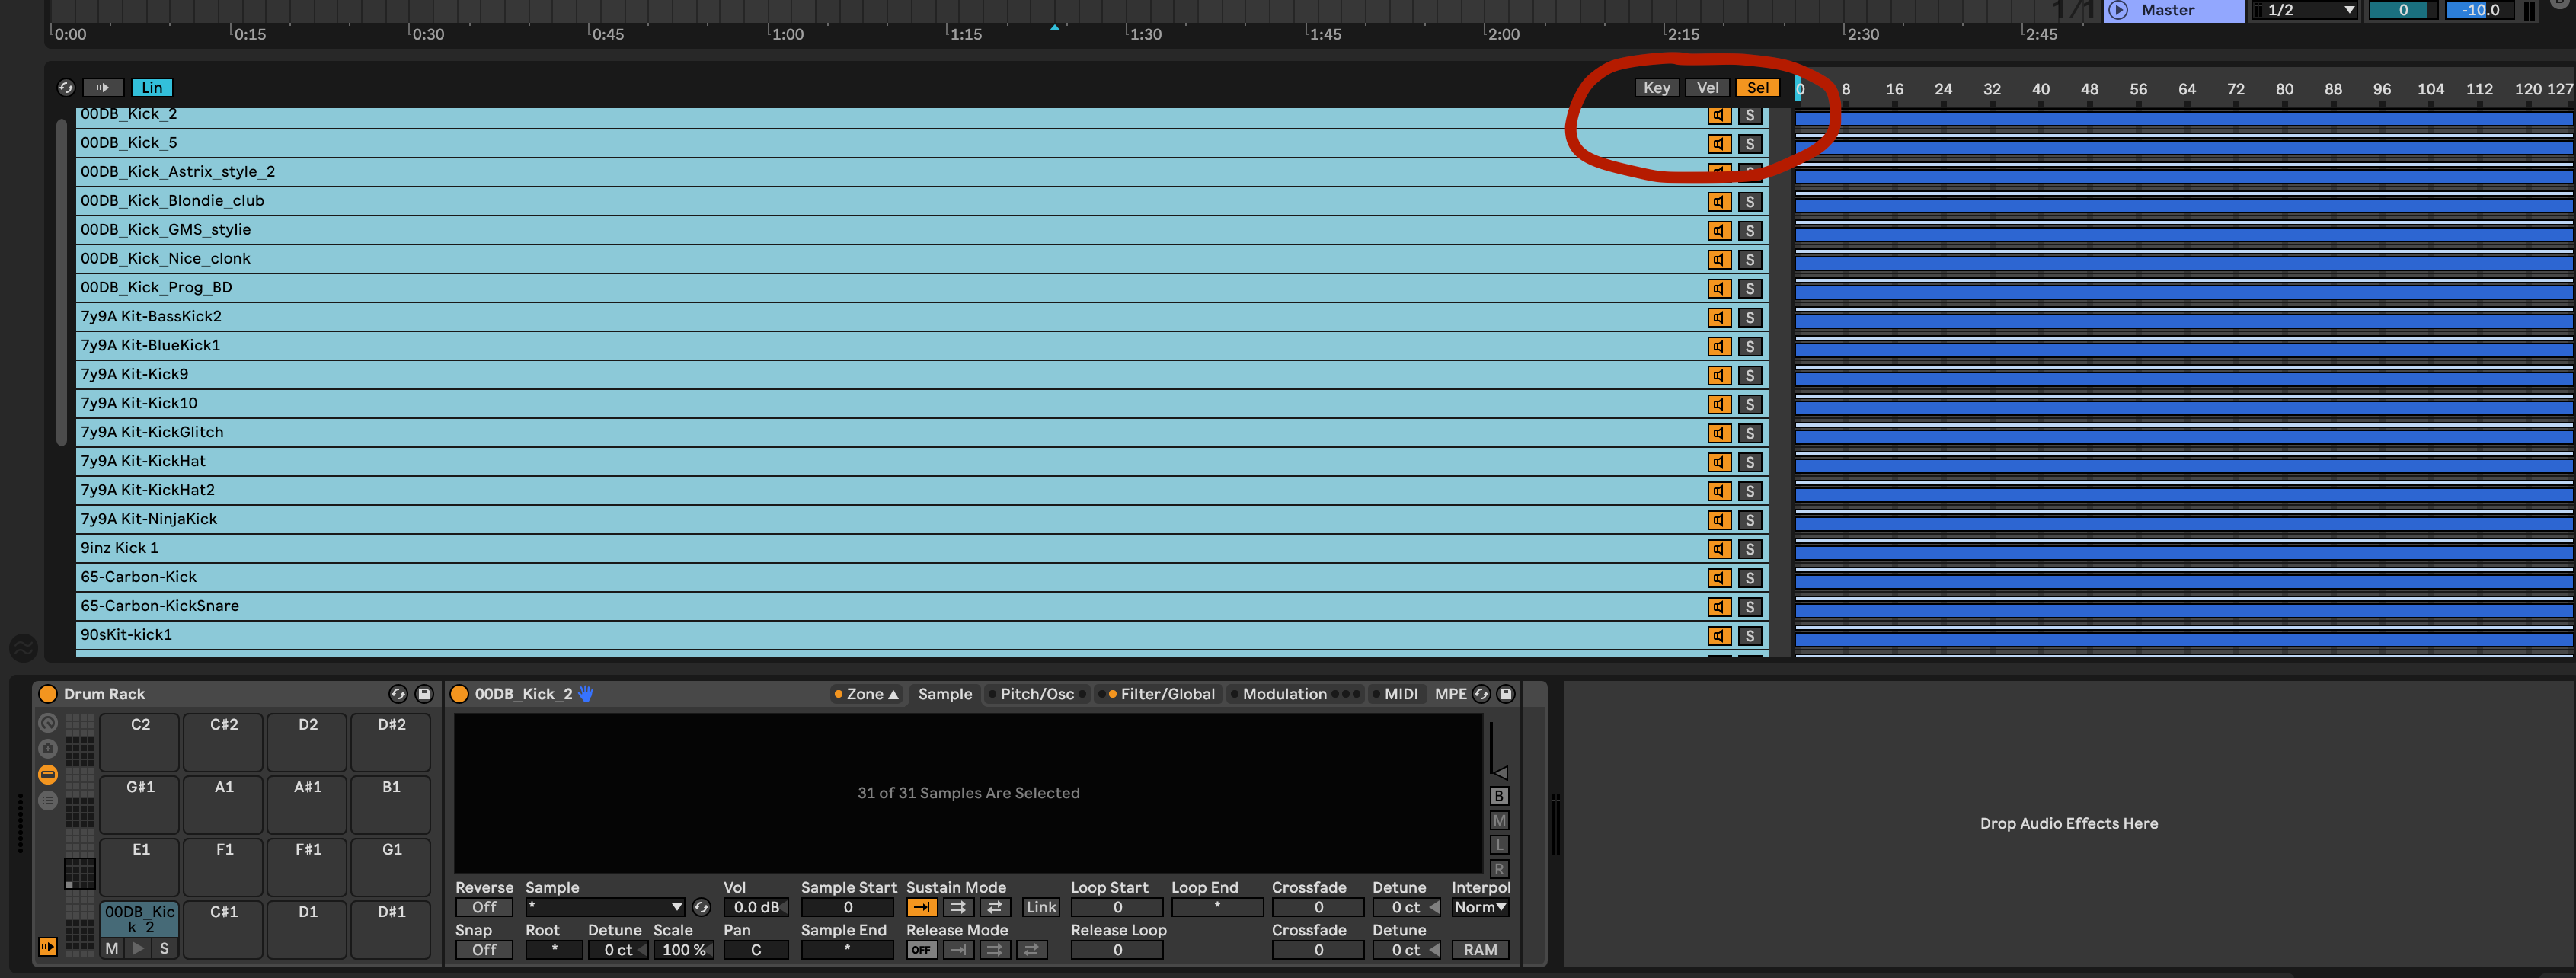
Once you are in the sample select menu, right click on the blue markers with all your drum sounds selected in the left pane.
Choose the option "Distribute Ranges Equally".
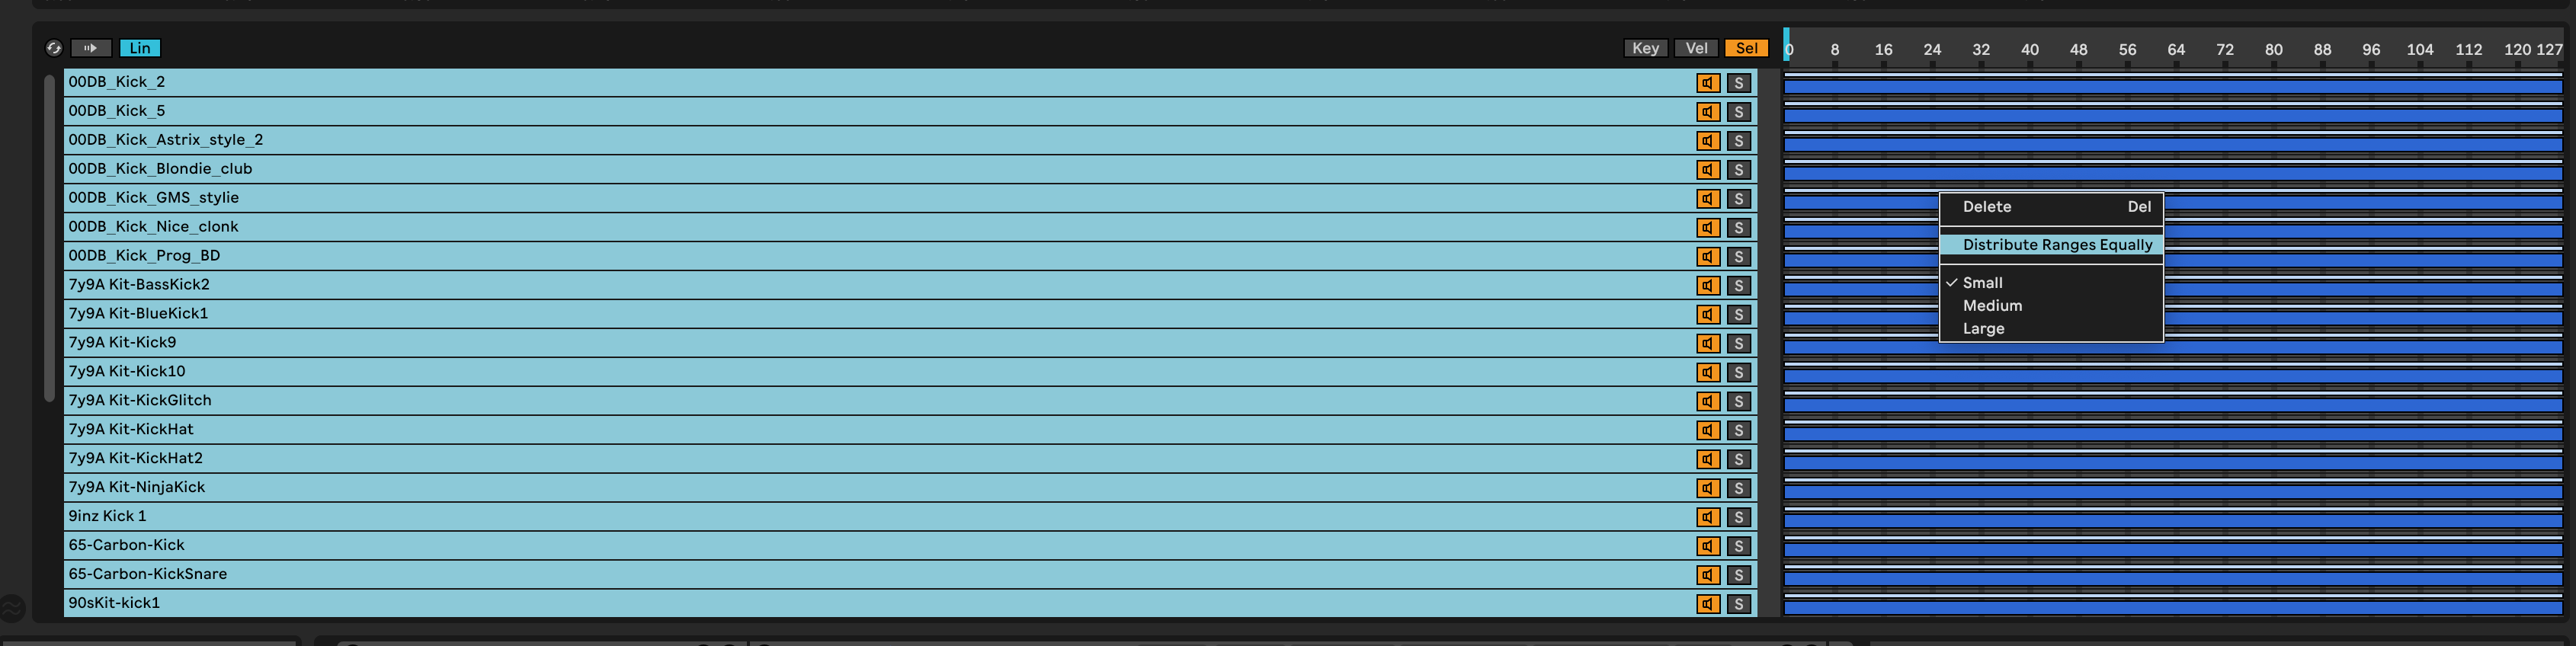
Now you should see the dark blue range indicators for each of the different drum sounds automatically arranged so none of them overlap.
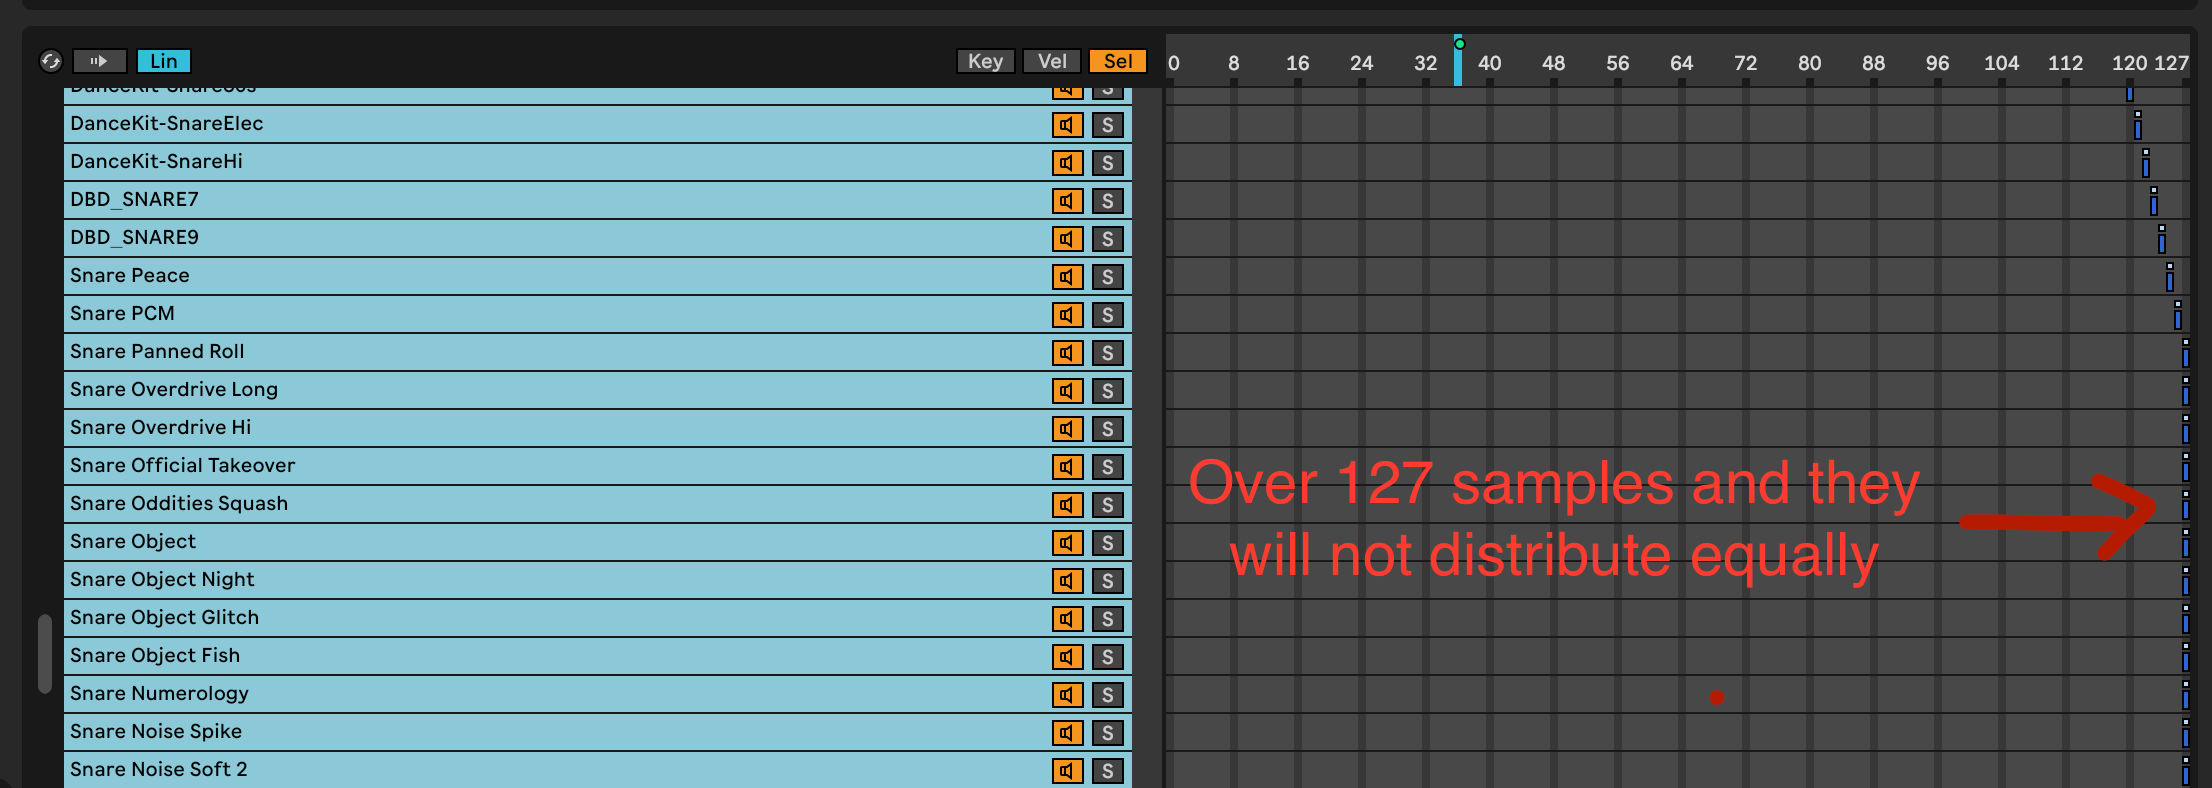
As a reminder, you can drag in more than 127 total samples, but you won't be able to distribute the ranges equally.
All your extra samples beyond that number will overlap and trigger at the same time.
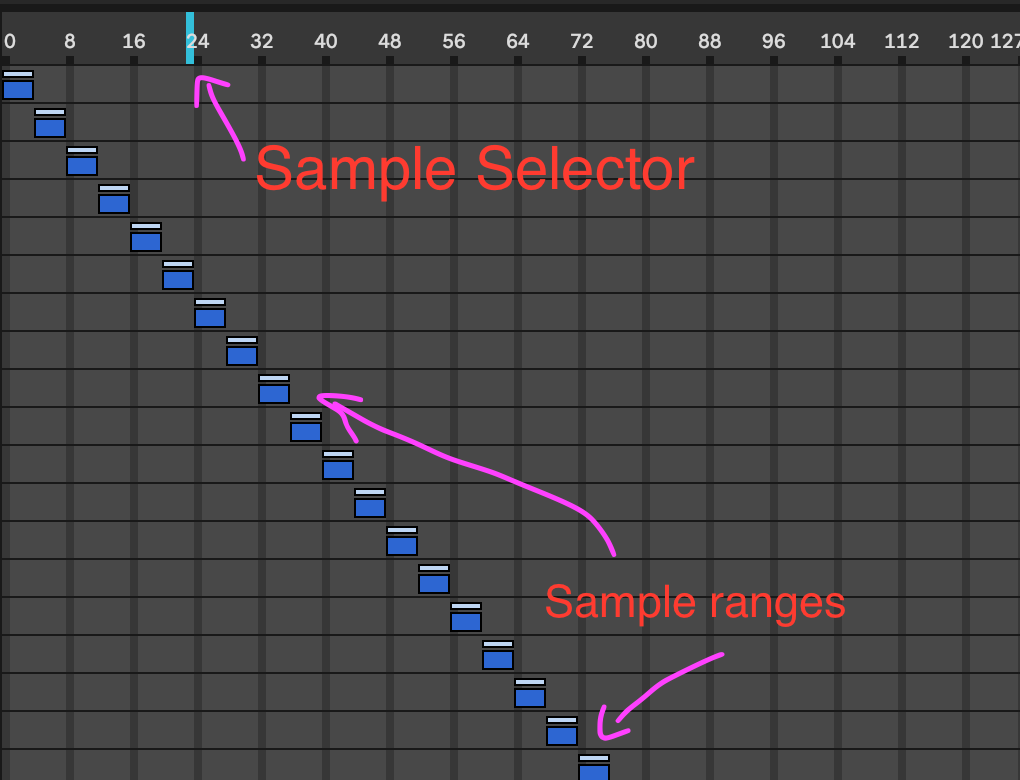
More importantly, there is a light blue sample selector at the top of the pane you can click and drag side to side.
Whatever sound files are in range of the selector will be played back. Since none of the sample ranges overlap, the selector can never be over more than one of them.
Therefore, we only hear one sample at a time. This is a good start. However, needing to fish around with the mouse to position the sample selector is annoying.
We can do better!
Right click on the sample selector and assign it to Macro 1 on your drum rack.
Rename Macro 1 to Kick Select. Now, you can turn this macro to select the Kick drum sample you want to play back.
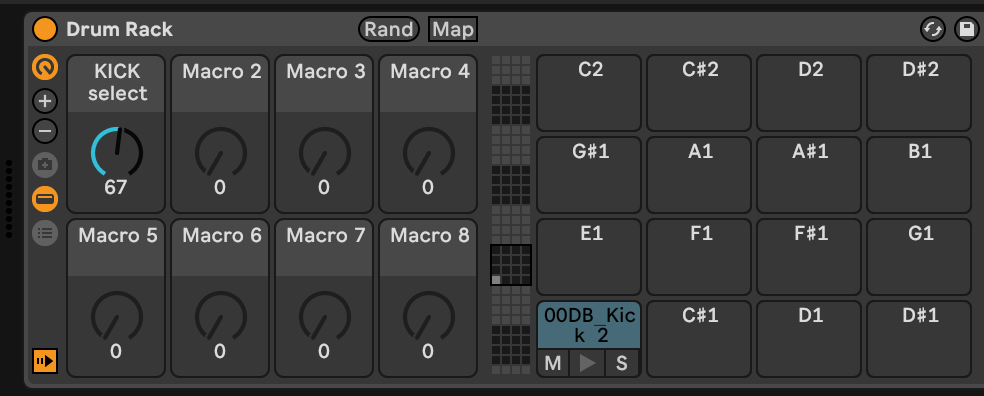
This is already more convenient. If you want to take this further, you can map that Macro to a knob on your MIDI controller.
Or if you want a more experimental idea, try mapping an LFO to that Macro so the kick sample that gets played back changes.
Lastly, rename the pad to something representative like, Kick Drum.
Adding Other Instruments
Hopefully by now you can see where we are going with this "drum rack to end all drum racks".
Next, you're simply going to repeat this process for each kind of sound you want to use.
For example, you might create a drum rack pad for your Snares and Hi Hats with a corresponding sample select Macro to allow you to quickly audition sounds.
Or automate to add some unpredictability to the track.
You also aren't limited to tradition drum kit instruments!
There's no reason why you can't set up a few drum rack pads with old movie clips, recordings from space, vocal chops, modular synthesizer loops, or any other sound you can dream up.
Crazy Sample Math
Also, despite being able to fit 127 drum samples per pad, you still might want to load up more to give yourself options, setup choke groups for similar sounds, or make some pads fixed sounds and others probability driven.
This gives you more space to dump samples in your instrument racks than you might realize.
You can in theory drive an entire track with a single drum rack and a single MIDI clip.
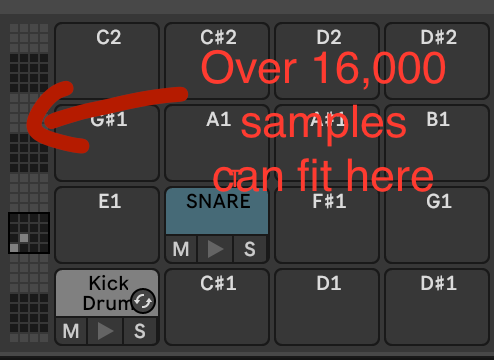
You can put 127 samples on each pad and you have 127 pads to work with.
That means you can put up to 16,129 possible samples on a single drum rack.
And you can drop audio effects after the Samplers to transform them.
Building More Diverse Drum Kits
This way of setting up your drum racks is a great way of demonstrating the power that drum racks offer.
However, you're probably going to use a bunch of these instead of a single 16,000+ sample monster.
Good luck finding the perfect drum sound in that mountain!
A good way to start grouping your drum racks in the DAW is by genre.
Make 2-3 of these racks for each genre you produce in and you will have your bases very well covered and then some.
For example, you load all your favorite Jungle samples in one drum rack.
Make another from Drum and Bass, then another for trap or modern Hip Hop, then yet another for old school Hip Hop, etc.
Yes, this is a lot of work to catalog each drum sound in your library.
But there's a perfect time to do this which you may not be utilizing.
Utilize the mise-en place philosophy to prepare for your work when you don't feel like working on music.
Mise-En Place

Mise-en place is a cooking term that means "to put in place".
When you're not doing the main task of cooking, you chop vegetables and organize the kitchen for when that time comes.
Music production works the same way.
Building a drum rack, tweaking instrument racks, or recording foley samples are good activities for those days when you aren't super inspired to write music.
(If you need more drum sounds to build with, of course we're here to provide professional drums you can use over and over again in your library.)
It will allow you to move more quickly when you're in the headspace to write music, but the bar of success is lower.
Writing music, coming up with melodies, programming drums, or recording instrumental takes are hard work that demand a lot of focus.
Dragging sound files into drum racks, building templates, making presets for VST instruments are all helpful but not so hard to accomplish.
Effects Processing
So far we have only discussed how far you can go just by arranging samples inside a drum rack.
But, you should also do some basic effects setup and adjustment to make sure it blends well.
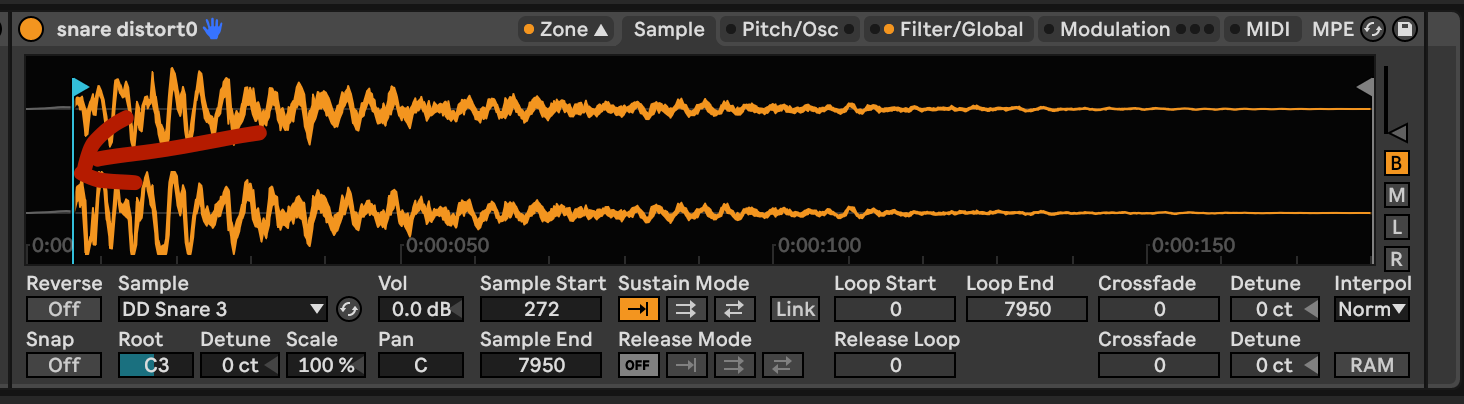
Adjust Sample Start times
Sometimes samples are not perfectly trimmed to the start of the transient.
In practice, this slight gap of a few milliseconds can make the sound feel late when you trigger it.
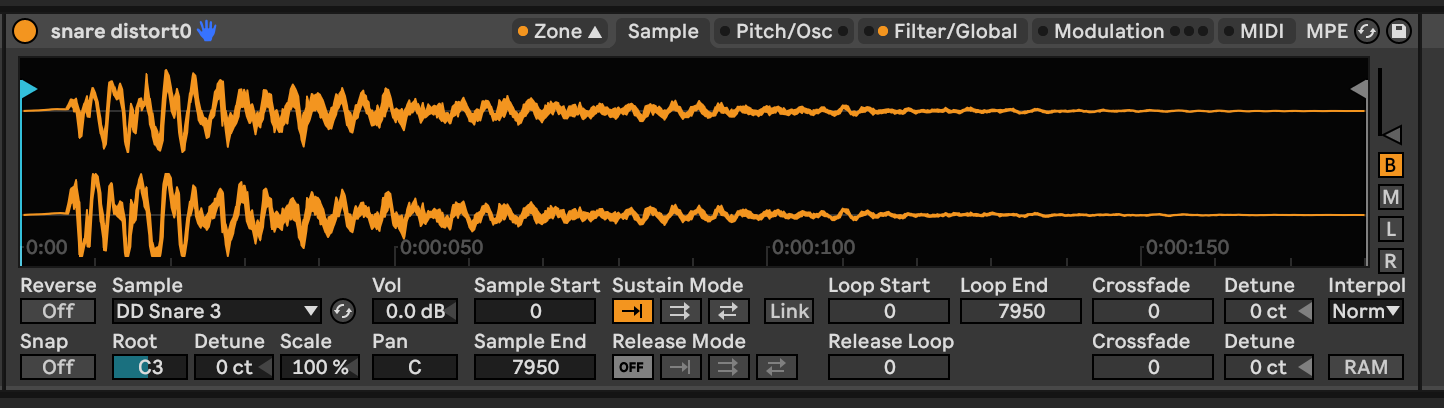
You will need to move the sample start marker to the beginning of where the transient begins to make sure the sample triggers on time.
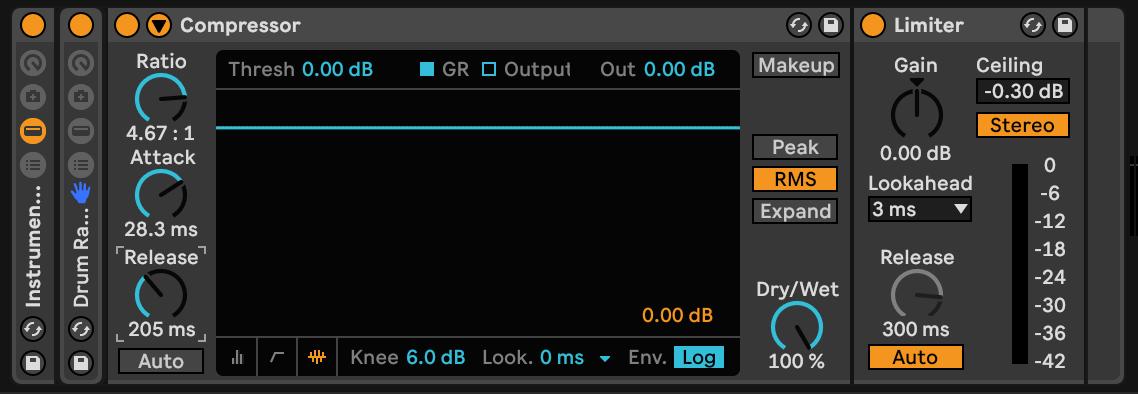
Add a compressor and limiter
Before we add additional creative effects, you should get in the habit of putting a basic compressor and limiter on your drum racks.
Use a ratio of 4-6, an Attack time of 32-60ms to let the transients through, and a Release time of 200-500ms.
Adjust the threshold by hand.
Remember, these are just an examples of where to get started
You want to adjust these by ear and make sure the compressor isn't getting too pumpy or crushing the transients prematurely.
Also, don't forget to put the drum rack, compressor, and limiter in a group.
Make Some Choke Groups
if you have similar types of sounds that live in the same frequency range you may want to assign them to choke groups so they don't trigger at once.

Optimize Volume Levels
You may notice some sounds hit your Limiter or Compressor very hard because they are significantly louder than the other sounds.
Don't try to fix this with more compression on individual drum pads or the whole kit will start to sound over compressed.
The best way to fix it is simply to adjust the volume level.
Do this inside Sampler inside the Filter/Global controls.

With a very large drum rack that has potentially hundreds or thousands of samples, it may be difficult to do this all in one day.
Just adjust them as you use the rack and save new, updated versions of the rack.
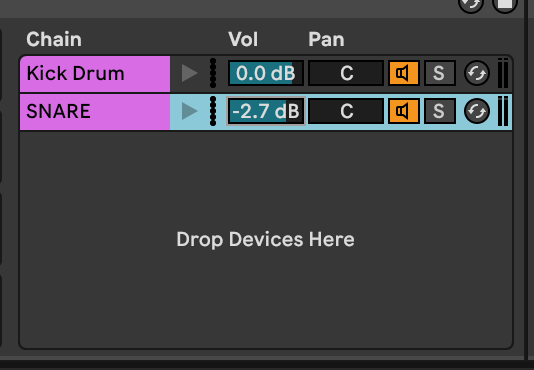
Also, don't forget you can adjust the volume for everything on a particular drum pad by going into the chain list and adjusting the volume of that collection of sounds.
Build More Instrument Racks
You can take this further with macro controls or creative effects, but at the least we hope you use this technique to make sure you make the most of all the sample packs you pick up.
And of course we hope you check out our packs when you decide to build more!

