

Using Ableton Loops For Creative Production & Performance
Ableton Live is one of the more unique DAWs out there because it lets you work with audio tracks and MIDI tracks in in ways that other options don't really have an equivalent of.
It can do most things that other DAWs can do like record and comp tracks together, but when it comes to looping and manipulating audio there are some features that truly make it stand apart from the rest of the pack.
A big reason for this is many commercial DAWs are designed by more traditional software companies and their target market is people in the music production, sync, or recording studio industry.
That's all well and good, but Ableton Live's history is a little different. It was designed from Max/MSP patches that the group Monolake used to perform live with.
It was designed by fairly avant-garde artists who, by their own admission, were not trying to take over the world and be the next Apple Computers.
Their early goals were to have a small, boutique software company and the founders thought they would have enough support from friends and colleagues that it would be a sustainable venture, so they created a quirky tool they actually wanted to use based on their own musical needs.
So, you may be here to ask...

Does Ableton have loops?
Common question, especially from people new to the software and the short answer is fuck yea it does! They even had a live event for a few years called, Loop. We were there a few times and it was a great vibe.
The entire Live ecosystem is built around loops for the most part. We're going to look at Live's looping possibilities through two lenses:
-
Using loops for live performance situations
-
Using loops in the studio to generate new ideas.
Before we get into the details, you need to understand the session view and the arrangement view in Ableton Live. This is a core concept to the software that approaches things a little differently than other DAWs which were basically built to mimic the function of a traditional tape deck.
The cool part about Live is it was built to be a live performance tool that you can also bring into the studio. This is what makes it really stand out as a piece of music technology. Nearly every other DAW available is setup to be a studio-only kind of tool you use to combine multiple tracks into a master track as your final product.
It's origins are in Monolake's late 90's Max/MSP patches that they used in live performance.
If you're curious, you can listen to some of the music they made with it here.
What is the difference between arrangement view and session view in Ableton Live?
Ableton Live is like two DAWs in one. The arrangement view is like most other DAWs you may be familiar with. There is a timeline with a fixed arrangement of sounds that you play back, which is more or less the same every time. '
The session view is designed to be more flexible. It uses a grid with audio clips that can be triggered at different times based on different conditions. We like to use this a lot in the early stages of a project because you can get a few ideas moving, then try to combine them in various way to see how they fit together.
The session view is also a lot of fun when playing live and there are entire midi controllers built around it. There is both Ableton's own Push I and Push II controllers and many similar controllers that utilize the 16x16 grid layout where each button on the grid allows the performer to trigger clips of sound.
(As of 2023, the Push 3 allows you to upgrade it with a processor and run Live on the hardware without a computer!)
Clips can have different lengths, follow actions that affect what clip is played next (we will explain follow actions in a bit), be audio files or MIDI, and all the clips are available more or less at the same time. A musician can trigger them at will.
You can set up the Session view to be stable and consistent for a live performance situation or you can make it very unpredictable and likely to surprise you.
Ableton Live's session view might be more desirable to be used in the studio this way, but for the adventurous, it's ready to take on stage too.
Basics
Recording Loops To The Arrangement View

You don't have to specify if a piece of audio or MIDI will be a loopable clip ahead of time. Simple record normally into the arrangement view, then click on the clip to open the clip view.
Why is the Ableton loop button greyed out?
You'll need to make sure Warp and Loop buttons are both engaged for that clip. If warping is not enabled, the Loop button will be greyed out. Turn warping on and you will be good to go!
Once you've done this, hover over the right edge of a clip and the mouse cursor will turn into a little bracket. You can then drag the clip infinitely and it will loop at the points you specify in the clip view.
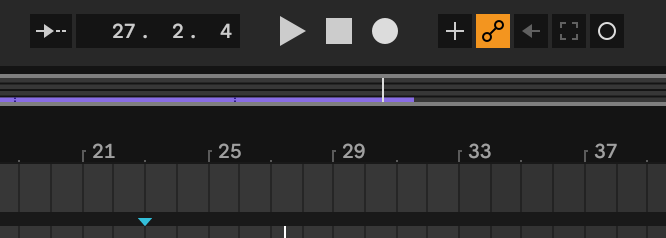
Simple Looping In Ableton's Arrangment View
Live also shows you the loop points in the arrangement view with a tiny, easy to miss marker in the clip which you can see in the image below.

The Arrangement Record Button vs Session Record Button
Remember how we mentioned Ableton Live is kind of like two DAWs in one? You may have noticed there are two record buttons!
What?! How does that work?
Ableton Live has a record button for the arrangement view and another for the session view.
Look at the transport bar at the top of the screen. The solid circle next to the stop and play buttons is the Arrangement Record Button. Click this and whatever tracks you have armed to record will record into the timeline like any other DAW.
What happens if you click the open circle record off to the right?
Two things:
First off, you'll notice that the track is greyed out. What? Are you still recording?
Yes you are.

But where? We'll show you. You are recording to the Session view!
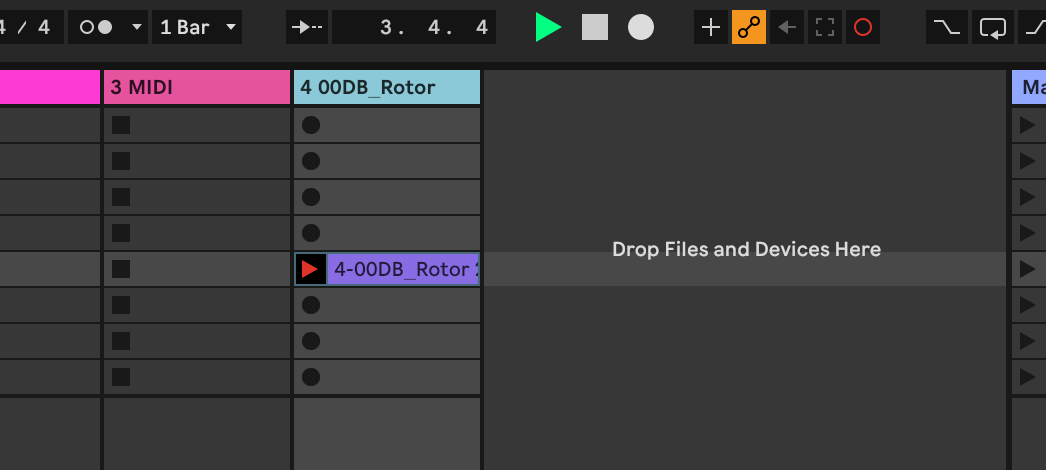
When you engage the Session Record Button Ableton will automatically start recording a looped clip into the selected clip slot in the session view.
Another Method For Recording Loops In The Session View
Let's focus on the Session View for a second. See how when you arm a track in the session side of Ableton, each clip slot has a circular button in each empty slot? Those are record buttons.
You can tell Ableton Live to record to a specific slot by clicking one of those buttons or mapping them to a MIDI controller. This works for both an audio track or recording a midi clip.
Loading Samples Into Clip Slots For Looping
You can alternatively just drag an audio file or midi clip into available slots on the session view.
If you plan on using a lot of pre-recorded clips for a Live performance, you definitely will want to do this ahead of time, not on stage, because you will usually have to set the clip's length, as well as the start and end markers for the loop by hand.
Doing this on stage is kind of playing with fire. If that's your thing, go for it but every time we've tried to do this its pure stress!
(After all there are people who literally play with fire on stage for the entertainment of other people so who are we to talk)
Creating Scenes in the Session View
Ableton Live has some cool features that allow you to have a "scene" of clips that can be started all at once
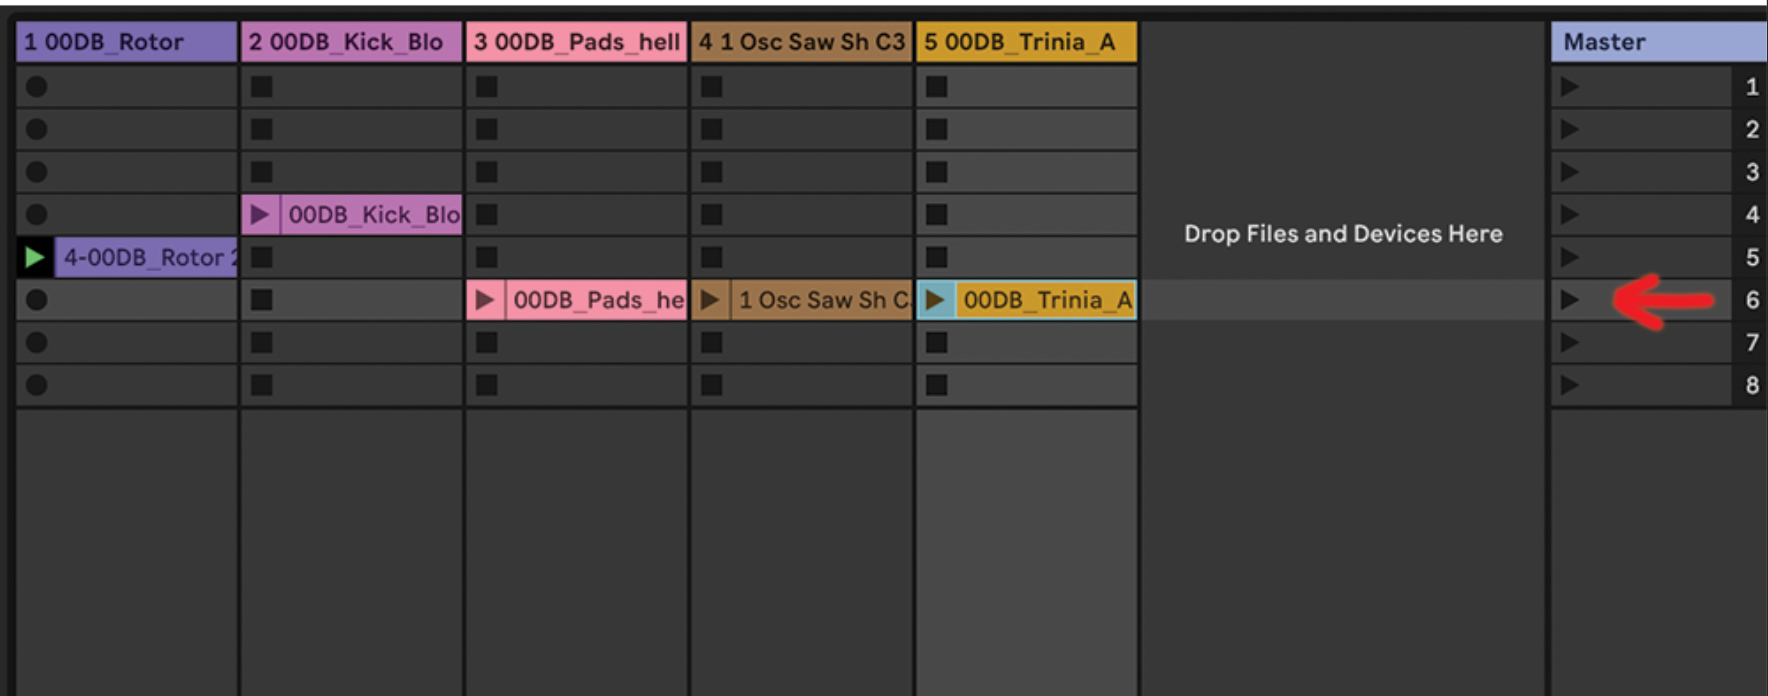
-
Each horizontal row of clips is a scene. Click the corresponding play button in the Master track and all those clips will launch together
-
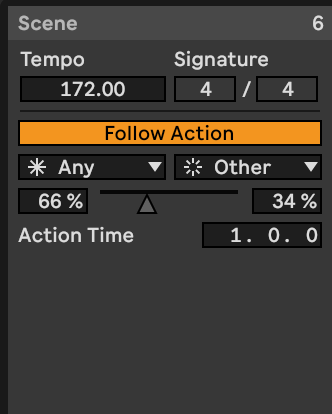
Launch Scenes. In Ableton 11, you can tell the program to switch to a particular tempo and time signature.
Expand the master track in the Session view by clicking on the edge of the pane and dragging, then you can enter this information.
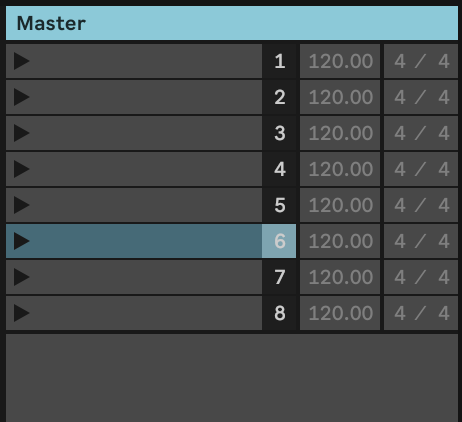
In Ableton Live 10 and earlier, it works a bit differently. You need to change the scene name and type out the tempo and time signature you want like this: 72 BPM; 7/8
-
Follow Actions for entire scenes. When you modify the tempo and time signature of a scene in Ableton Live, a dialog in the lower left corner of the screen will allow you to set what Follow Action you want and what it's probability is. This is a new feature only available in Ableton 11.
Hold on, what the heck is a Follow Action?
This one of those features you wouldn't think you'd want to have until you see it in action and in our opinion one of the really special things Ableton can do that other DAWs don't have an equivalent of.
We've talked about how you can load sounds from one of your sample packs in the session view and trigger them with a midi controller like the Ableton Push.
What happens when a clip plays? One of three things:
-
the clip play until the end, then stops when it runs out. This is often referred to as a "one-shot" sample.
-
The clip loops forever until you till it to stop.
-
The Follow Action decides to trigger another clip.
Follow Actions in Ableton Live are a way of programming a clip to trigger other clips in a probabilistic way.
Follow Actions For Live Performance & Idea Generation
If this still doesn't make a ton of sense yet, let's walk through an example that can be used to help you create new ideas or improvise live in a cool way.
-
Take a few different drum breaks, load them into clip slots on a track in the session view, warp them to tempo, and make sure they all loop smoothly. It's ok if the loop length is different, in fact this is usually more interesting.
-
Highlight all of them, enable Follow Actions, and click the Legato Button. Keep Quantize set to Global (will explain Quantization a little further down in the article).
-
Normally Follow Actions occur at the end of the clip with the default Linked Mode enabled. Change this to Unlinked. Now we can tell Ableton to engage the Follow Action after a certain interval of time.
-
In the Follow Action time control, we're going to set it to 0.1.0 which translates to every beat. These three numbers correspond to measures.beats.16th notes. So 1.0.0 would engage at the start of every measure. 0.0.1 would engage every new 16th note.
-
Finally set one of the Follow Actions to 100% probability with the slider and choose Other. This means to play any other clip other than the one that just played.
Here are each of the above steps demonstrated with video
This is a great way to mangle a bunch of sounds and experiment in the studio or improvise live. You can see in the video its still possible to trigger sounds with the clip play buttons, as well as fade between two opposing Follow Actions.
Be careful about overloading your CPU if you're going to do this live, but in theory this can be used to chop up as many drum breaks as your computer can handle, as long as you don't mind having a ton of clips in the same track.
Help! My clips are launching but everything is out of time!
First thing to check is that the clip is launching from a logical place and second that the loop markers are also in a logical place.
Usually the launch marker and loop marker will be in the same place, but you may not always want that, for example if you want to play a short intro, but then loop the clip only when there is a drum beat.

Also, double check for problems like this. See how the loop start marker is slightly off the grid? This will cause the loop to slowly drift out of time with everything else because the clip is slightly longer than everything else.
It's really easy to miss these when your zoomed all the way out if you were not editing with snap to grid turned on. Zoom all the way in an double check these points.

Global launch quantization in Ableton Live
We also recommend that you double check that all clips are set to global launch quantization and that the global launch quantization is set to something reasonable for the music. Usually this is 1/4 or or 1/8 but that is dependent on your music.
You can find this control in the upper left of the screen near the metronome control.
What can Ableton Looper be used for?
Ableton Live's ecosystem is built around being about to loop things, so why would they also have a dedicated Looper plugin? The short answer is simply because people asked for it! Why now?
One example is if you have the rest of your session view setup to manage audio tracks for a live performance that you also want to do some live looping inside of that, it might be more manageable to map your midi controller to the Looper device because it's laid out more like a guitar pedal.
Some people also will use Looper as a studio tool when doing sound design because it allows the user to quickly record, then re-record clips of audio.
There's a lot of overlap between the Looper and Live's native looping functionality to it's best to experiment with both, then just use the one that fits your workflow better.
Get some loops
All this sounds fun but you need some sounds to get started experimenting with Live's looping magic?
Be sure to check out our sample packs, virtual instruments, and Ableton devices to inspire you and create something that speaks to your style.


